Your Samsung Galaxy S9 connects to the Internet primarily through a WiFi network but out of the box it’s set to connect via mobile data. The former is the most preferred as you can do whatever you want without the fear of using up your allotted data before the month ends but if the connection keeps on dropping or disconnecting, then such problem has to be addressed as soon as possible.
In this post, I will guide you in troubleshooting your Galaxy S9 that keeps on dropping its connection to a WiFi network. I will share with you the most effective procedures to make your phone work perfectly again. So, if you’re one of the owners of this device, continue reading as this article may be able to help you.
But before we move on to our troubleshooting, if you found this post while looking for a solution to a different problem, then visit our Galaxy S9 Help Guides page for we have already fixed many issues that were reported by owners. We may have already published articles that could help you fix your problem.
Going back to the problem at hand, here are the things you need to do to fix your Galaxy S9 with WiFi connection that keeps on disconnecting…
- Restart your Galaxy S9
- Power-cycle network equipment if possible
- Forget WiFi Network and reconnect
- Reset Network Settings
- Factory Reset Galaxy S9
If your phone has been working properly prior to the problem, then perhaps the issue is just minor and temporary. More often than not if that’s the case you can fix the problem by simply rebooting your phone. So, before anything else, restart your S9 normally and if that’s doesn’t fix the problem, perform the forced reboot by pressing and holding both volume down and power keys for 10 seconds or more.
The next thing you have to do is to restart all your network equipment if you are connecting to your own network. Power off your modem or router and leave them unplugged for a minute or two. After that, plug it back in, wait for it to broadcast the network and have your phone reconnect to it. Continue using your device to know if the connection still drops. If so, move on to the next procedure.
It’s now time to refresh the connection of your phone and to do this you have to “forget” the network your phone is currently connecting to and then allow your device to rescan area and reconnect to the same network.
- Swipe up on an empty spot from the Home screen to open the Apps tray.
- Tap Settings.
- Tap Connections.
- Tap Wi-Fi.
- Select the Wi-Fi network you wish to forget or remove. Or you can also delete all saved networks on the phone to prevent any of them from causing conflicts.
- Tap Forget to confirm.
After this and the connection still drops, then move on to the next procedure.
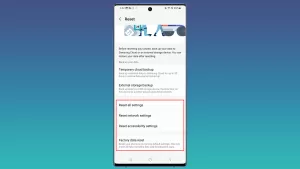
At this point, it is necessary to bring your phone’s network settings back to factory defaults and you can do it by resetting network settings. It will also delete network caches and possibly corrupt data files used by the firmware so your phone can connect wirelessly.
- Swipe up on an empty spot from the Home screen to open the Apps tray.
- Tap Settings.
- Tap General Management.
- Scroll to and tap Reset.
- Select the option to Reset network settings. This will erase all your current network settings and restores the default values.
- Tap Reset Settings.
- If prompted, enter your device PIN or password.
- Tap Reset Settings again to confirm action.
Based on experience, the previous procedures have been proved effective in fixing network-related issues but if the problem continues after this, then you have no other choice but to reset your phone.
Before you do the reset, make sure to make a backup of your important files and data as they will be deleted during the process especially ones that are stored in your phone’s internal storage. Once everything is backed up, follow these steps to reset your Galaxy S9:
- Swipe up on an empty spot from the Home screen to open the Apps screen.
- Tap Settings.
- Tap General management.
- Tap Reset.
- Select the Factory data reset option.
- Scroll to the bottom of the screen then tap Reset.
- Select the option to DELETE ALL.
- If prompted, enter your credentials for screen lock and Samsung account verification.
- Tap Confirm to continue.
- Wait for the reset to finish and your device to reboot.
I hope that this how-to post has helped you one way or another. Please help us spread the word by sharing this post to your friends or people who may also have similar problems. Thanks for reading!
RELATED POSTS:

